Docusign eSignature Integration 101: Implementing JWT authentication and sending your first envelope

See how to combine Maestro workflows, the Maestro API, ID Evidence API, and private extension apps to create a secure, flexible identity verification flow that fits seamlessly into your onboarding process.

Let’s say you’re a developer at a financial or insurance platform that’s rapidly expanding into new markets. Your team has been tasked with automating parts of the customer onboarding process, including verifying a client’s identity before generating sensitive documents. You need to build a flow that’s secure, compliant with regional Know Your Client (KYC) requirements, and easy to adapt as your product evolves.
But there’s a catch: your team wants to avoid embedding hardcoded verification logic into your main app. You also need visibility into each verification step, the ability to store ID artifacts for audit purposes, and a way to validate certain data against your internal systems.
Fortunately, Docusign offers a suite of APIs and developer tools that solve these challenges. In this blog, I’ll walk you through how your team can build a compliance-ready identity verification workflow using Docusign Maestro, ID Evidence API, and private extension apps for custom data checks. Along the way, I’ll highlight key developer features and show how to integrate identity flows into a modern application stack without sacrificing flexibility or control.
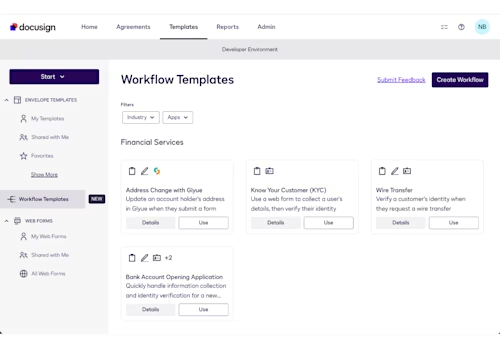
To start, you’ll want to create a workflow using Docusign Maestro. Within your Docusign developer account, you’ll find workflow templates available for you to use. You can use the Bank Account Opening Application workflow template, available in your Docusign account, as a starting point. This workflow contains a prebuilt sequence of steps relevant to customer onboarding, including an identity verification step, collecting data through web forms, and signature collection with eSignature.

Figure 1: Maestro workflow templates available in your Docusign account
You can customize this workflow template to fit your organization’s needs by editing step conditions, adding your own logic branches, and inserting additional verification or data collection components. In particular, ensure that the identity verification step is properly configured to match your compliance requirements, and review the webhook and variable mappings.
Once saved and published, your workflow becomes callable via the Maestro API.

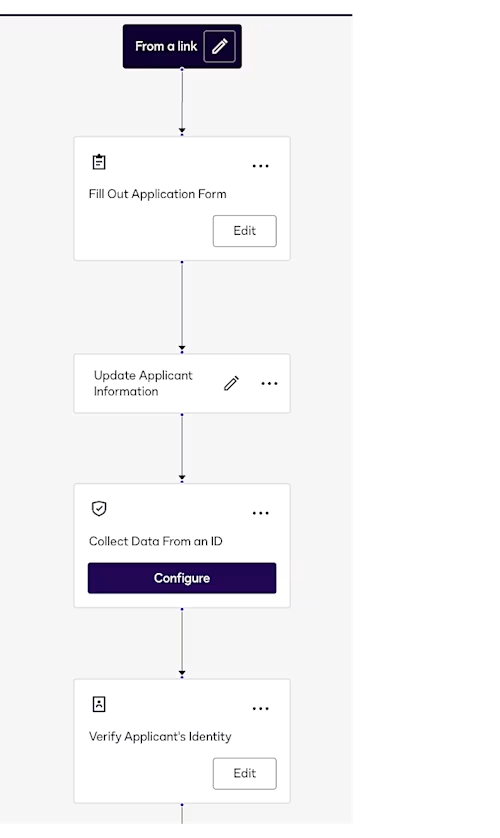
Figure 2: An example workflow from the Bank Account Opening template
The Maestro API lets you trigger, manage, and monitor multistep agreement workflows. Rather than hardcoding workflow logic into your application, you can define the flow in Maestro and then call it from your back end when needed.
Once your workflow is published, use the Maestro API to trigger the workflow from your application. You can pass signer details, metadata, and any custom input your workflow expects. The API also allows you to track the workflow’s execution status, retrieve results, and respond to errors or fallbacks.
To trigger the workflow from your application, the Maestro API expects a structured request payload with the necessary input values. In the example below, a temporary JSON file is created and populated with signer and CC recipient details, which are passed into the workflow as trigger inputs:
request_data=$(mktemp /tmp/request-wf-001.XXXXXX)
printf \
'{
  "instance_name": "'"$instance_name"'",
  "trigger_inputs": {
    "signerEmail": "'"${signer_email}"'",
    "signerName": "'"${signer_name}"'",
    "ccEmail": "'"${cc_email}"'",
    "ccName": "'"${cc_name}"'"
  }
}' >$request_data
This approach enables developers to dynamically construct the input payload using real-time data submitted by users or retrieved from backend systems. Once generated, the contents of this file can be included in an API request to instantiate the workflow and initiate the agreement process.
If an exception occurs—like a failed verification—you can handle it immediately through retry logic or reroute the user in your application. By centralizing workflow logic, the Maestro API helps you reduce application complexity while retaining granular control.
The ID Evidence API supports a wide range of verification methods including government-issued ID scans, biometric selfie capture, electronic IDs, and knowledge-based authentication (KBA). Developers can use the API to extract structured data and media, monitor verification status, and fulfill compliance or audit requirements.
Within the Maestro workflow, you can include a Collect Data from an ID step, which lets you extract structured data from the signer’s verified ID. This data—such as first name, last name, and date of birth—is automatically captured from the scanned document and stored in workflow variables. Developers can use these variables throughout the workflow to drive conditional logic or pre-fill documents. For example, if a user’s age is below a certain threshold, the workflow could route them to an exception process. You can also configure the collected data to be included in webhook notifications or routed back to your backend for further processing.
The Bank Account Opening Application template already includes an identity verification step configured to capture this type of information. Fields such as name, ID number, expiration date, and issuing country can be extracted and mapped to workflow variables or returned via webhook, making it easier to integrate verified identity data directly into your application’s logic.
Key capabilities of the ID Evidence API include:
Retrieving metadata about each verification event, including timestamp, verification method, and result
Accessing media files such as scanned ID documents and selfies
Supporting flexible storage or integration options for audit or fraud-prevention workflows
You can use this data to log verification outcomes, trigger fallback steps if the verification fails, or archive evidence for auditing and compliance.
To retrieve identity verification results for a specific signer, you can use the ID Evidence API’s Events: list endpoint. This enables your application to programmatically fetch metadata about the verification session—such as timestamps, status, and verification outcomes—using the signer’s unique recipient ID.
In the example below, a temporary file is used to store the JSON response from the API. The request is sent using curl, and the HTTP status code is captured for logging or error handling:
uri="https://proof-d.docusign.net/api/v1/events/person/${recipientIdGuid}.json"
response=$(mktemp /tmp/response.XXXXXX)

echo "Retrieving recipient data"

status=$(curl -s -w "%{http_code}" --request GET "${uri}" \
	"${Headers[@]}" \
	--output ${response})
This script retrieves the verification event data for the specified signer and saves the output to a temporary file. You can then parse this file to extract verification status, timestamps, or evidence IDs, depending on what your integration needs for auditing, compliance, or downstream logic.
By pulling verification media through code, you maintain full control over where and how evidence is stored.
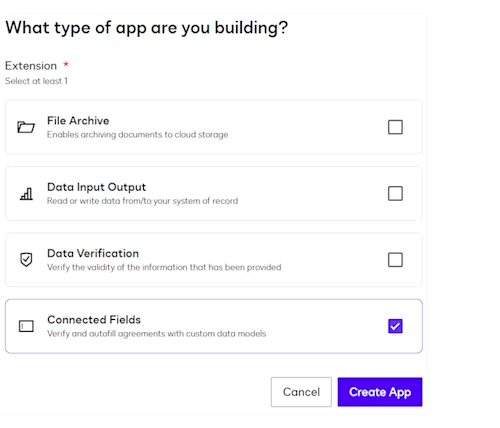
For identity workflows that require additional backend checks—such as verifying account numbers or policy IDs—you can build a private extension app that includes custom data verification logic.
Use the Connected Fields API to sync field values with your organization’s systems. For instance, when a signer enters an account number, the extension can call an internal API to confirm that it exists and belongs to the verified user. If the value is invalid, the workflow can immediately prompt the user to try again or redirect to manual review.
You can manage retries, error messages, and alternate routing based on your business rules, ensuring that the workflow adapts to real-world edge cases without introducing friction.

Figure 3: Extension App configuration screen
By combining Maestro workflows, the Maestro API, ID Evidence API, and private extension apps, you’ve built a secure, flexible identity verification flow that fits seamlessly into your onboarding process. You’ve avoided hardcoding verification logic into your app, gained visibility into each verification step, and created a scalable foundation for future compliance needs. With the Docusign IAM platform, developers gain the flexibility to enforce compliance standards, reduce fraud risk, and adapt to evolving regulatory requirements—without starting from scratch every time.
Check out the use case guide for Compliance and identity verification to learn how Docusign for Developers enables you to power secure, compliant verification workflows.
Review the Maestro API Overview to learn how to trigger and manage workflows via API.
Use the ID Evidence API Guide to retrieve ID verification results and media.
Take a look at the Extension Apps Overview to build custom verification logic.
See the Configure a Collect Data From an ID Data Step guide to extract structured data from scanned IDs.
Check out another technical blog that explores identity and data verification: From NIGO to STP: A developer's guide to custom data verification and the Connected Fields API

Niani Byrd joined the Docusign Developer Content team in 2024 as a Programmer Writer. With a background in software engineering and technical writing, she is passionate about helping developers discover and leverage the features of Docusign's APIs to build innovative solutions. Outside of work, she loves spending time with her dog, Niko.
Related posts
