
Reducing manual agreement work: Automating file export to cloud storage
Implement a Docusign file output to cloud storage solution that reliably, securely writes customer files to your cloud storage system.

This blog post is part of a series about automating the movement of files between external systems and the Docusign platform. Using Docusign for Developers, your organization can transfer files with a few clicks or automate the process entirely. To support this, our extension apps feature is being enhanced with file input and output extensions. They enable you to connect your file storage systems and data sources for file import and export. File transfers can be initiated from Docusign platform components such as Navigator (our smart agreement repository) and Maestro workflows. In this post, I’ll cover building extension apps that export files to cloud storage from workflows.
The customer experience
This walkthrough demonstrates how to implement file output from the Docusign platform to a proprietary cloud storage system, incorporate file output into a workflow, and trigger the workflow programmatically via API calls. The customer experience of this sample implementation is described in the next sections.
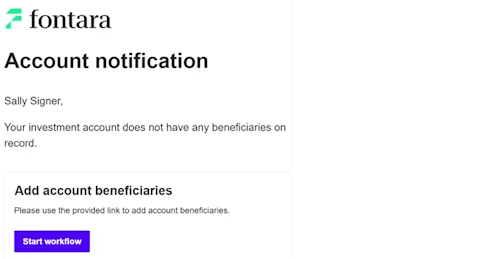
A customer receives an email notification
An automated email is sent to a customer whose investment account has no beneficiaries designated. The email includes a link to start the process to add beneficiaries.
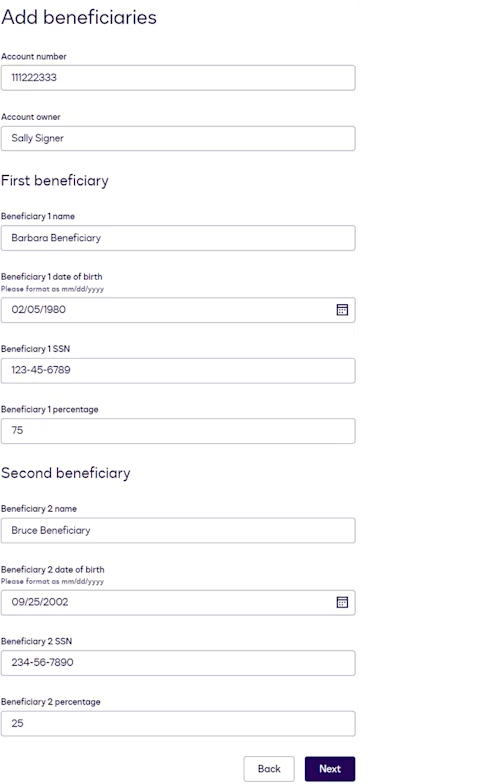
The customer enters information in a web form
On selecting the emailed link, the customer is routed to a web form. The form is prepopulated with customer information retrieved from the company database, such as the account number and account owner name. The customer fills out beneficiary information and submits the form.
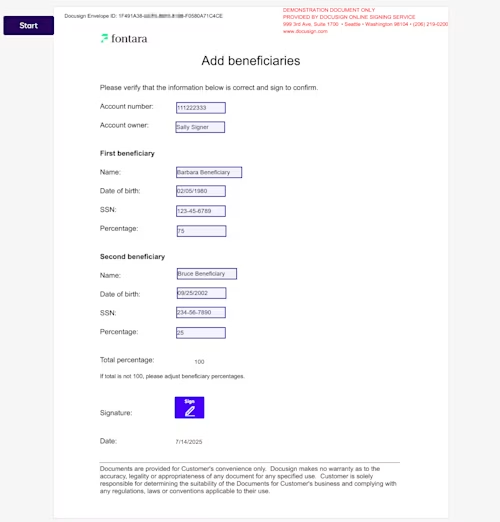
The customer signs an eSignature envelope
The beneficiary details are displayed in an eSignature envelope for the customer to review and sign.
The completed envelope is written to cloud storage
The completed envelope is automatically written to the company’s cloud storage system. The write operation is tailored to the cloud storage structure, enabling the appropriate drive or similar container, folder path, and file naming convention to be specified, along with the file contents.

The next sections explain how to build a similar solution that can be tailored to your own organization’s business needs.
Implementation: Extension app
An extension app is an application that provides additional functionality for Docusign agreement processes via requests to an external API service. Depending on the features required, an extension app implements one or more of the supported extensions. For this use case, the file output cloud storage extension is used. This extension is invoked during configuration of a file output workflow step and during execution of file output at workflow run time.
Build an extension app
Your organization creates an extension app that can receive and respond to requests that Docusign sends to your app’s API endpoints. The requests that Docusign sends are described in the next sections. Details about the request and response formats appear in the file output cloud storage extension contract reference.
List Drives request
Docusign sends this request when a workflow process builder configures a file output step. The request obtains a list of drives on the cloud storage system. If the cloud storage system organizes folders and files under a different container type, the request can retrieve those containers instead.
This request is optional. If it is implemented, a process builder can select the drive or other container type to which files will be stored. If this request is not implemented, the extension app’s business logic must select the destination drive or other container type.
An example List Drives response is shown here:
{
  "containerType": "drive",
  "data": [
    {
      "containerId": "123456",
      "containerName": "Customer account documents"
    },
    {
      "containerId": "234567",
      "containerName": "Customer account reports"
    }
  ]
}List Directory Contents request
Docusign sends this request during file output step configuration to obtain a list of folders on the cloud storage system.
This request is optional. If it is implemented, a process builder can drill down through the directory structure to select the folder to which files will be stored. The process builder can also define a naming convention for a new folder to be created. If this request is not implemented, the extension app’s business logic must select the destination folder.
An example List Directory Contents response is shown here:
{
  "parentId":"123456"
  "data":[
    {
      "type":"folder",
      "name":"Beneficiary documents",
      "id":"345678",
      "parentId":"123456"
    },
    {
      "type":"folder",
      "name":"Transfer requests",
      "id":"456789",
      "parentId":"123456"
    }
  ]
}Write File request
Docusign sends this request at workflow run time to write a file to the cloud storage system. The request includes the file name, plus the file contents encoded as a Base64 string. If the extension app implements List Drives, a drive or similar container ID is included. If the extension app implements List Directory Contents, the destination folder path is included. Both the file name and folder path can include variables that are populated at run time to create a unique folder and file name for each file.
An example Write File request is shown here:
{
  "files": [
    {
      "contents": "JVBERi...VFT0YK",
      "basename": "Document ID {{Send Documents for Signature.Envelope ID}}Dated {{Send Documents for Signature.Date Signed Field 1}}.pdf",
      "path": "Beneficiary documents/Customer {{Account owner Name}}/Document ID {{Send Documents for Signature.Envelope ID}}Dated {{Send Documents for Signature.Date Signed Field 1}}.pdf",
      "pathTemplateValues": [
        "Sally Signer",
        "11721000-xxxx-xxxx-xxxx-2a498b65b09b",
        "2025-08-10T15:28:14.000Z"
      ]
    }
  ],
  "rootId": "123456"
}In the example request, double curly braces enclose variable names that must be replaced with values from the pathTemplateValues array. The file contents supplied in this write request would be stored to the drive with ID 123456, to the folder path Beneficiary documents/Customer Sally Signer/, and with a file name of Document ID 11721000-xxxx-xxxx-xxxx-2a498b65b09bDated 2025-08-10T15_28_14.000Z.pdf.
IT infrastructure to support the extension app
The infrastructure to support an extension app includes these components:
API proxy: Required if requests from Docusign are not in the format required by the extension app’s API endpoints, or if the responses are not in the format that Docusign expects.
Authorization: The extension app must support the authorization parameters that Docusign sends and meet the authorization response requirements.
Network configuration: Review the network setup required to ensure that Docusign can communicate with the extension app.
Register the extension app with Docusign
Any extension app that will be called from Docusign agreement processes must be registered with Docusign. Registration provides Docusign with information it needs to obtain authorization from the extension app and send requests to its endpoints.
In addition, registration sets the extension app’s distribution options. See Choosing private distribution instead of public for details about how to make an app available only to specified Docusign accounts or to all accounts. See Globalization for information about setting the regions in which an app will be available.
Extension apps can be registered in the Developer Console using a guided, form-based UI or by uploading a JSON extension app manifest file. Below is a sample app manifest file for an extension app that implements file output to cloud storage. Authorization parameters, including endpoint URLs, appear in the connections object. The extensions object specifies that this is a file output cloud storage extension. The actions object defines each request type that Docusign will send to the external service, including the endpoint URL. See App manifest reference for details about the file structure and properties.
{
  "name": "Account beneficiary update",
  "description": {
    "short": "Writes beneficiary documents to cloud storage",
    "long": "This app is designed to write completed account beneficiary documents to a cloud storage system."
  },
  "termsOfServiceUrl": "https://www.fontara.com/tos",
  "privacyUrl": "https://www.fontara.com/privacy-security",
  "supportUrl": "https://www.fontara.com/support",
  "publisher": {
    "name": "Fontara",
    "email": "sample@fontara.com"
  },
  "connections": [
    {
      "name": "authentication",
      "description": "Secure connection to sample extension app",
      "type": "oauth2",
      "params": {
        "provider": "CUSTOM",
        "clientId": "8d606a57-xxxx-xxxx-xxxx-219e80c7ed16",
        "clientSecret": "lfvZIUH…leaGCreU=",
        "scopes": [],
        "grantType": "authorization_code",
        "customConfig": {
          "authorizationMethod": "header",
          "authorizationParams": {
            "prompt": "consent",
            "access_type": "offline"
          },
          "authorizationUrl": "https://www.fontara.com/api/oauth/authorize",
          "requiredScopes": [],
          "scopeSeparator": " ",
          "tokenUrl": "https://www.fontara.com/api/oauth/token",
          "refreshScopes": []
        }
      }
    }
  ],
  "icon": {
    "data": "iVBORw0KGgoAAAANSUhEUgAAAGAAAABgCAYAAADimHc4AAAACXBIWXMAACxLAAAsSwGlPZapAAAAAXNSR0IArs4c6QAAAARnQU1BAACxjwv8YQUAAADcSURBVHgB7dwxCsMwEADBc8j/v+zUgTRJZNY2M6ULF1oOhECaAQAAAAAA7m778G0fjvS25o8hJUBMgJgAMQFi23xvX/ivK1uyDiYgJkBMgJgAMQFizzm/f8+mTr07MwExAWICxASICRC7wi7o1mdMJiAmQEyAmAAxAWICxASICRATICZATICYADEBYgLEBIgJEBMgJkBMgJgAMQFiAsQEiAkQEyAmQEyAmAAxAWICxASICRATICZATICYADEBYgLEBIitvCfsxd0fmICYADEBYgLEBAAAAAAAADjYCwxUBYWYirDwAAAAAElFTkSuQmCC",
    "mediaType": "image/png"
  },
  "screenshots": [],
  "extensions": [
    {
      "name": "My File Output Cloud Storage Extension",
      "description": "Writes files to cloud storage",
      "template": "FileIO.Version1.FileOutputCloudStorage",
      "actionReferences": [
        "list-directory-contents",
        "list-drives",
        "write-file"
      ],
      "capabilities": [
        "FileIO.Version1.ListDirectoryContents",
        "FileIO.Version1.ListDrives"
      ]
    }
  ],
  "actions": [
    {
      "name": "list-directory-contents",
      "description": "Returns a list of folders on a cloud storage system",
      "template": "FileIO.Version1.ListDirectoryContents",
      "connectionsReference": "authentication",
      "params": {
        "uri": "https://www.fontara.com/api/listdirectorycontents"
      }
    },
    {
      "name": "list-drives",
      "description": "Returns a list of drives on a cloud storage system",
      "template": "FileIO.Version1.ListDrives",
      "connectionsReference": "authentication",
      "params": {
        "uri": "https://www.fontara.com/api/listdrives"
      }
    },
    {
      "name": "write-file",
      "description": "Writes a file to a cloud storage system",
      "template": "FileIO.Version1.WriteFile",
      "connectionsReference": "authentication",
      "params": {
        "uri": "https://www.fontara.com/api/writefile"
      }
    }
  ],
  "signupUrl": "https://www.fontara.com/signup",
  "publicationRegions": [
    "US"
  ],
  "distribution": "PRIVATE"
}Test the extension app
After an extension app has been registered with Docusign, these Developer Console testing features verify that Docusign can access the extension app:
Connection test: Verifies that Docusign can obtain authorization from the extension app
Extension tests: Verify that Docusign can send requests to the extension app or API proxy endpoints and process the responses
Implementation: Maestro workflow
Maestro is a Docusign platform service that executes agreement workflows. You can use the no-code Maestro workflow designer to build a workflow that includes a file output step that invokes the extension app. The example workflow described here also includes steps that display a web form and an eSignature envelope. The completed workflow configuration looks like this:
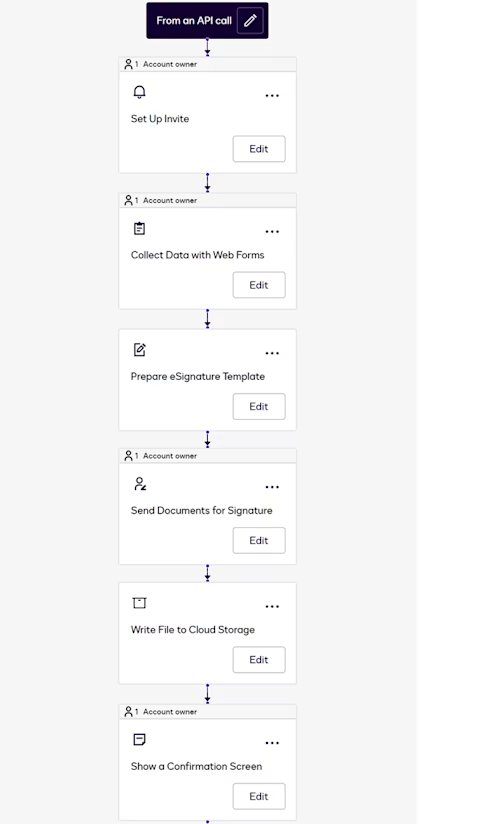
Note: Maestro supports additional types of workflow steps for features such as identity verification. See Agreement Process Steps for more information.
The next sections provide configuration details for a workflow that can be triggered programmatically and includes the steps in the example use case.
Workflow participant
A participant is a customer who completes the steps of a workflow. This use case requires a single participant representing an investment account owner who will add beneficiaries to their account.

See Define Workflow Participants for more information.
Start method: From an API Call
The start method determines how workflow instances are initiated. An instance is a runtime execution of the steps in a workflow for a specific customer. The From an API Call method triggers instances programmatically via a Maestro API request, described later in this blog post.
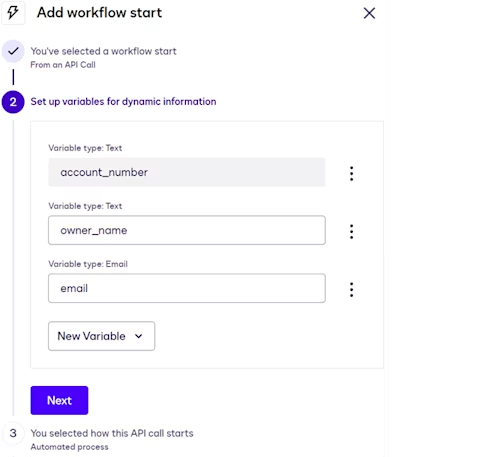
For this use case, the start method definition includes these workflow variables, all of which will be populated with values from the Maestro API request:
acount_number: This will be displayed in the web form and envelope in subsequent workflow steps.owner_name: This will be displayed in the web form and envelope in subsequent workflow steps.email: This will be used in the workflow step that triggers an email to the customer with a link to the workflow instance.
See Workflow Start Methods for more information.
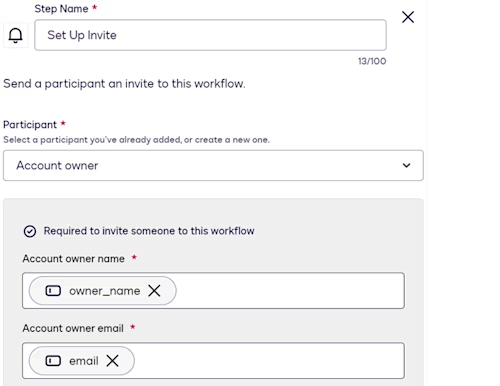
Set Up Invite step
This step defines the mechanism for customers to access workflow instances—in this case, an emailed link. The participant name and email address are mapped to the owner_name and email workflow variables. As a result, Docusign will populate the workflow instance invitation with the customer name and email address supplied in the Maestro API request that triggers the instance.
See Configure a Set Up Invite Step for more information.
Collect Data with Web Forms step
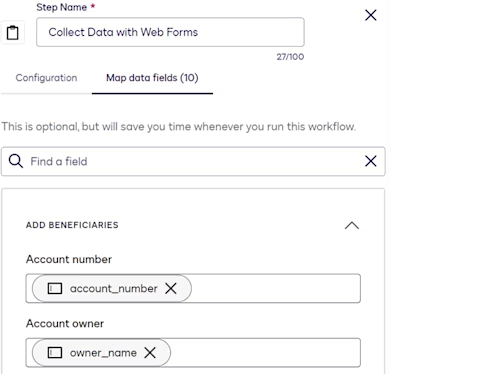
This step displays a web form to a customer. To include this type of step in a workflow, you must first create a web form that includes the appropriate fields for your business requirements. See Build a Maestro Workflow-Compatible Web Form for details.
For this use case, the web form’s Account number and Account owner fields are to be populated with values passed in the Maestro API request that starts the workflow instance. To configure this, those web form fields are mapped to the account_number and owner_name workflow variables.
See Configure a Collect Data with Web Forms Step for more information.
Prepare eSignature Template step
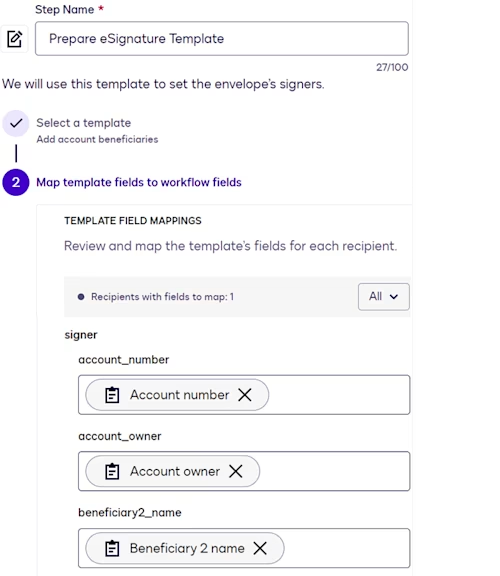
This step designates an eSignature template to use as the source for envelopes that will be generated during workflow execution. See How To Create a Template for detailed steps to create an eSignature template.
For this use case, each template field is mapped to a corresponding web form field so that the envelopes are automatically populated with customer-supplied values from the web form.
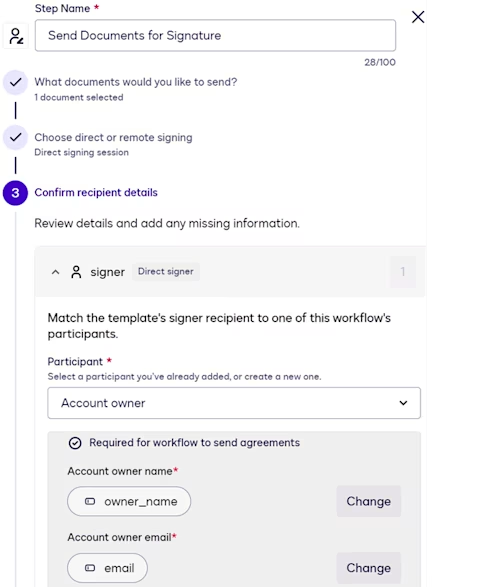
Send Documents for Signature step
This step displays an eSignature envelope for signature. When configuring this step, you select the template designated in the previous step, a direct signing session, which displays the envelope in the same browser tab as the web form, and the workflow participant.
File output step
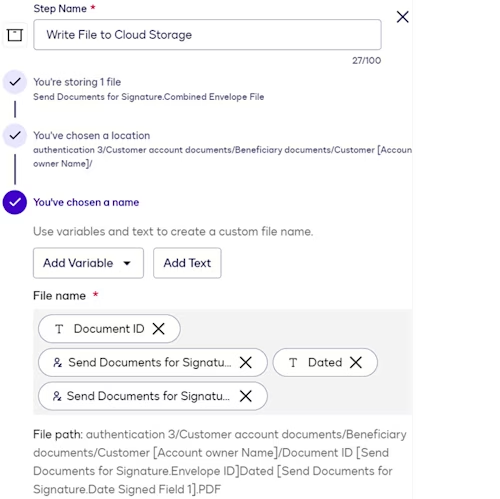
This step writes the envelope that a customer completes during the Send Documents for Signature step to the cloud storage system. It invokes the file output to cloud storage extension app.
When adding this step to a workflow, you select your extension app. For the extension app to appear in the step selection list, it must be registered with Docusign and installed and connected to the Docusign account in which the workflow is being created.
During file output step configuration, you can:
Select a drive or similar container type as the file destination. The step configuration page displays a drive list only if the extension app implements the List Drives request.
Select a folder path for files. You can drill down through multiple levels in the directory structure. You can also elect to create a new folder and supply a naming convention for it. Folder selection controls are displayed only if the extension app implements the List Directory Contents request.
Define a naming convention for files.
Naming conventions for folders and files can include workflow variables, which enables you to construct names that will be unique to each workflow instance. In the example shown here, the naming convention includes hardcoded text, as well as variables representing the envelope ID and date signed.
Show a Confirmation Screen step
This step displays a message in the UI to inform the customer that the workflow has been completed. When configuring this step, you supply the message content.
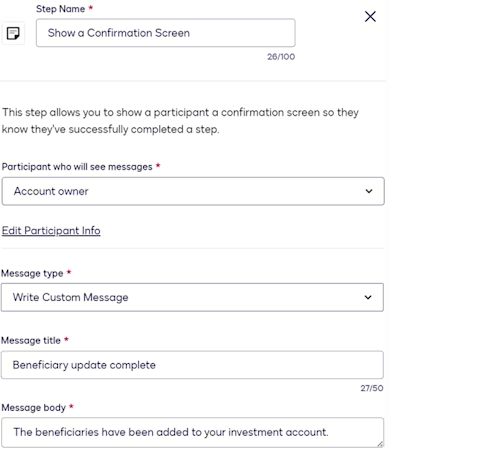
See Configure a Show a Confirmation Screen Step for more information.
Implementation: Maestro API integration
An API integration is an application that incorporates Docusign features by making requests to one or more Docusign APIs. For this use case, the API integration sends requests to Maestro API endpoints to retrieve workflow information and trigger the start of workflow instances. An instance is a runtime execution of the steps in a workflow for a specific customer.
Your organization creates the API integration that sends requests to Maestro API endpoints, processes the responses, and implements any other required business logic, such as retrieving customer information from a database. See Build a Docusign integration for an overview.
To start instances of a workflow programmatically, the integration must implement, at minimum, three Maestro API requests to Docusign. These are described in the next sections.
Request to retrieve list of workflows
A Workflows:getWorkflowsList request retrieves a list of workflows available in a Docusign account. The response includes each workflow’s name, its ID, and additional information, as shown below.
{
  "data": [
    {
      "id": "d2e88d35-xxxx-xxxx-xxxx-c78f140e63b6",
      "name": "Add account beneficiaries",
      "account_id": "1caf2cc9-xxxx-xxxx-xxxx-14d63c1ced6b",
      "status": "active",
      "metadata": {
        "created_at": "2025-06-06T16:02:44.581+00:00",
        "created_by": "b3b270eb-xxxx-xxxx-xxxx-1a07c8265b92",
        "modified_at": "2025-07-14T21:54:52.603+00:00"
      }
    },
  ],
  "response_metadata": {
    "response_timestamp": "2025-07-14T21:57:28.9838405Z",
    "response_duration_ms": 1318
  }
}The API integration extracts the ID of the workflow to be triggered programmatically. The ID is included as a path parameter in subsequent requests.
Request to retrieve requirements for triggering workflow instances
A Workflows:getWorkflowTriggerRequirements request retrieves the requirements to start instances of the workflow whose ID was obtained from the previous request. For this example, the requirements include the customer-specific values that have been defined as workflow variables: account_number, owner_name, and email.
{
  "trigger_id": "c30c7afc-xxxx-xxxx-xxxx-0a6488822fca",
  "trigger_event_type": "HTTP",
  "trigger_http_config": {
    "method": "POST",
    "url": "https://api-d.docusign.com/v1/accounts/1caf2cc9-xxxx-xxxx-xxxx-14d63c1ced6b/workflows/d2e88d35-xxxx-xxxx-xxxx-c78f140e63b6/actions/trigger"
  },
  "trigger_input_schema": [
    {
      "field_name": "account_number",
      "field_data_type": "String"
    },
    {
      "field_name": "owner_name",
      "field_data_type": "String"
    },
    {
      "field_name": "email",
      "field_data_type": "Email"
    }
  ],
  "metadata": {
    "created_at": "2025-06-06T16:02:44.581+00:00",
    "created_by": "b3b270eb-xxxx-xxxx-xxxx-1a07c8265b92",
    "modified_at": "2025-07-14T22:08:22.132+00:00",
    "response_timestamp": "2025-07-14T22:08:39.9400283Z",
    "response_duration_ms": 1207
  }
}The API integration extracts the workflow variable names from the trigger_input_schema object so that it can populate them in requests to start workflow instances.
Request to start a workflow instance for a customer
A Workflows:triggerWorkflow request instructs Docusign to start an instance of a workflow for a customer. For this use case, the request includes customer-specific values that are populated in the account_number, owner_name, and email properties in the request’s trigger_inputs object.
{
  "instance_name": "Beneficiary update for account 111222333",
  "trigger_inputs": {
    "account_number": "111222333",
    "owner_name": "Sally Signer",
    "email": "sally.signer@email.com"
  }
}
In addition to the requests described here, the Maestro API has endpoints that can be used to manage and monitor workflow instances. See the Maestro API Reference for details.
Test the Maestro API integration
Docusign recommends testing your Maestro API integration to confirm that:
It can authenticate with the Docusign platform.
Its requests to Docusign succeed.
Any backend processing that the API integration implements is executed successfully.
Implementation: End-to-end testing
After you have implemented the extension app, the workflow, and the API integration, you should perform end-to-end tests to confirm that:
The API integration can trigger workflow instances and supply customer-specific data used in workflow instances.
A test user receives a workflow invitation email and can access the workflow instance, complete the web form, and complete the eSignature envelope.
The extension app is invoked and writes the completed envelope to the cloud storage system using the configured location and naming convention.
Implementation: Move to production
To use a file output to cloud storage solution with a Maestro API integration in production, you must complete the following:
File output to cloud storage extension app: Submit the app for Docusign review. After Docusign approves it, it can be published for use in the production environment.
Maestro API integration: Request a Go-Live review. After the integration passes review, the integration can be promoted to the production environment.
Note: Only members of the Docusign Partner Program can publish a public extension app. Production API integrations must belong to a paid or a partner production Docusign account. See Join now for details on how to join the Docusign partner program.
Get started with file output to cloud storage
A file output to cloud storage implementation ensures that your organization’s agreements are reliably, securely stored as soon as your customers complete them. The Docusign for Developers suite of tools provides everything you need to develop an application tailored to your organization’s or your customers’ specific business cases. To take the first steps, visit the Docusign Developer Center to sign up for a free developer account and learn more, or explore the benefits of the Docusign Partner Program. Ready to try it? Get started with our file output to cloud storage reference implementation and our Maestro API sample app.
Additional resources
Read an introduction to the file output cloud storage extension.
Get details about the extension’s requests and responses.
Learn what you can do with Maestro workflows.
Get an overview of the Maestro API.
See the example code in the Maestro API how-to guide.

Julie Gordon joined Docusign in 2021. As a member of the Developer Content and Advocacy team, she creates content, media, and code to help developers learn how to use Docusign technology. With a background in software quality assurance and technical writing, she produces meticulously researched and tested documentation of APIs, developer tools, and low-code/no-code platforms.
Related posts
Docusign IAM is the agreement platform your business needs


