Integrate seamless workflow automation to Salesforce with Docusign Maestro API
Learn how to integrate Docusign Maestro API with Salesforce for automated agreement workflows.

Docusign Maestro streamlines agreement workflows, enabling users to build and deploy tailored, automated processes without writing code. Through the Maestro API, Salesforce developers can create a flow action. This enables Salesforce users and administrators, who prefer declarative, no-code tools such as Flow, to initiate Maestro workflows directly from Salesforce. This no-code approach facilitates the creation of complex integrations between Salesforce and Docusign.
This blog post follows our previous post, Configuring Salesforce for scalable and secure Docusign integrations. Building on that post as a foundation, I will show you how to integrate the Docusign Maestro API with Salesforce.
Configuring named credentials for the Maestro API
Follow the instructions in the first blog until Step 2; then begin the steps below.
Step 3: Create an external credential in Salesforce
In Salesforce Setup, search for and select External Credentials.
Select New External Credential.
Enter a Label (such as “MaestroExternalCredential”) and Name (“ MaestroExternalCredential”).
Set Authentication Protocol to OAuth 2.0 and Authentication Flow Type to Browser Flow.
Set Scope to signature extended aow_manage. Note: Including aow_manage is required for the Maestro API.
For Authentication Provider, select the OpenID Connect provider created in Step 2 (such as Docusign”).
Select Save.
Scroll down to Principals and select New.
Enter a Label (such as “DocusignNamedPrincipal”).
Choose Named Principal or Per User Principal for Identity Type.
Set Scope to signature extended aow_manage. Note: Including aow_manage is required for the Maestro API.
Select Save.
Create a new Permission Set (such as “ExternalCredentialPermission”).
Under External Credential Principal Access, enable the principal you created (see above, “DocusignNamedPrincipal”) for your external credential. Assign this permission set to users who need access.
Step 4: Create a named credential linked to the external credential
In Salesforce Setup, search for and select Named Credentials.
Click New Named Credential.
Enter a descriptive Label (e.g., MaestroAPI) and a Name (this name will be used in External Services).
Enter the Docusign API base URL:
Developer environment: https://api-d.docusign.com/v1
Production: https://api.docusign.com/v1
In the External Credential field, select the external credential created in Step 3 ( “MaestroExternalCredential”).
Select Save.
Step 5: Trigger a Maestro workflow using named credentials in Apex
To follow the instructions below, you will need to have a published Maestro workflow that was configured in Docusign with the API call as a start method to trigger it.
Reference the named credential:
In your Apex code, use the name of your Named Credential in a callout to call the Maestro API.
Example: Apex code to retrieve a list of all available Maestro workflows. This uses the Workflows: getWorkflowsList method of the Maestro API.
String accountId = '2ec17bee-90f1-xxxx-af85-b1ee3558f9xx';

HttpRequest req = new HttpRequest();
req.setEndpoint('callout:MaestroAPI/accounts/'+accountId+'/workflows');
req.setMethod('GET');
Http http = new Http();
HTTPResponse res = http.send(req);
String responseBody = res.getBody();

// Deserialize into a generic map
Map<String, Object> root = (Map<String, Object>) JSON.deserializeUntyped(responseBody);

// Navigate to data > workflows
if (root.containsKey('data')) {
        Map<String, Object> data = (Map<String, Object>) root.get('data');

        if (data.containsKey('workflows')) {
             List<Object> workflows = (List<Object>) data.get('workflows');

             for (Object wfObj : workflows) {
                  Map<String, Object> wf = (Map<String, Object>) wfObj;
                  String id = (String) wf.get('id');
                  String name = (String) wf.get('name');

                  System.debug('Workflow ID: ' + id);
                  System.debug('Workflow Name: ' + name);
     System.debug('\n');
            }
       }
}Example: Apex code to trigger the Maestro workflow using the workflow ID
First, make an API call to Workflows: getWorkflowTriggerRequirements to retrieve the input requirements necessary to trigger a specific Maestro workflow.
String accountId = '2ec17bee-xxxx-xxxx-xxxx-b1ee3558f967'; String workflowId = '10b50319-xxxx-xxxx-xxxx-f33cb4aabf9e'; Http http = new Http(); HttpRequest request = new HttpRequest(); request.setEndpoint('callout:MaestroAPI/accounts/' + accountId + '/workflows/' + workflowId + '/trigger-requirements'); request.setMethod('GET'); request.setHeader('Content-Type', 'application/json'); HttpResponse response = http.send(request); if (response.getStatusCode() == 200) { System.debug(response.getBody()); } else{ System.debug('Error: ' + response.getStatusCode() + ' - ' + response.getBody()); }Then make an API call to Workflows: triggerWorkflow to trigger a new instance of a specified Maestro workflow using the workflow ID and passing the required input/s.
String accountId = '2ec17bee-90f1-xxxx-af85-b1ee3558f9xx';
String WorkflowId = '0b50319-3002-xxx-a130-f33cb4aabfxx';

// Build the HTTP request
Http http = new Http();
HttpRequest req = new HttpRequest();
      req.setEndpoint('callout:MaestroAPI/accounts/'+accountId+'/workflows/'+workflowId+'/actions/trigger');

req.setMethod('POST');
req.setHeader('Content-Type', 'application/json');

// Optional: Add input variables if your workflow requires them
Map<String, Object> payload = new Map<String, Object>{
     'instance_name' => 'Send envelope (sales2)',
     'trigger_inputs' => new Map<String, Object>{
         'client name' => 'Joe Doe',
         'client email' => 'example@example.com'
      }
 };

 req.setBody(JSON.serialize(payload));

 // Send the request
 HttpResponse res = http.send(req);

 // Handle response
 if (res.getStatusCode() == 202) {
      System.debug('Workflow triggered successfully.');
      System.debug('Response: ' + res.getBody());
} else {
    System.debug('Failed to trigger workflow. Status: ' + res.getStatusCode());
    System.debug('Response: ' + res.getBody());
}
Integrating with Salesforce Flow Builder with the Maestro API
With the preceding examples, a Salesforce developer can build a flow action that enables a Salesforce user or administrator who prefers using declarative, no-code tools, such as Flow, to initiate the Maestro workflow directly from within Salesforce. This delivers a no-code experience, enabling users to construct intricate use cases for integrating Salesforce and Docusign, all without requiring any coding.
The Apex class below demonstrates how to create a flow action. Moreover, it includes all code examples discussed so far:
Step 1: Create a flow action
public with sharing class MaestroAPIService {
    // the value must match an existing Named Credential
    public static  string namedCredintialName = 'MaestroAPI';

    public class TriggerRequirement {
        public String id;
        public String name;
        public String type;
        public Map<String, Object> metadata;
    }

    public static List<Map<String,String>> getAvailableMaestroWorkflows(String accountId, String workflowId){
        List<Map<String,String>> workflowsList = new List<Map<String,String>>();

        HttpRequest req = new HttpRequest();
        req.setEndpoint('callout:'+namedCredintialName+'/accounts/'+accountId+'/workflows');
        req.setMethod('GET');
        Http http = new Http();
        HTTPResponse res = http.send(req);
        String responseBody = res.getBody();

        // Deserialize into a generic map
        Map<String, Object> root = (Map<String, Object>) JSON.deserializeUntyped(responseBody);

        // Navigate to data > workflows
        if (root.containsKey('data')) {
            Map<String, Object> data = (Map<String, Object>) root.get('data');

            if (data.containsKey('workflows')) {
                List<Object> workflows = (List<Object>) data.get('workflows');

                for (Object wfObj : workflows) {
                    Map<String, Object> wf = (Map<String, Object>) wfObj;
                    Map<String, String> workflow = new Map<String, String>{
                        'id' => (String) wf.get('id'),
                        'name' => (String) wf.get('name')
                    };
                    workflowsList.add(workflow);
                }
            }
        }
        return workflowsList;
	}

    public static String getTriggerRequirements(String accountId, String workflowId) {
        String endpoint = 'callout:'+namedCredintialName+'/accounts/' + accountId + '/workflows/' + workflowId + '/trigger-requirements';

        Http http = new Http();
        HttpRequest request = new HttpRequest();
        request.setEndpoint(endpoint);
        request.setMethod('GET');
        request.setHeader('Content-Type', 'application/json');

        try {
            HttpResponse response = http.send(request);
            if (response.getStatusCode() == 200) {
                // Pretty-print JSON
                return formatJson(response.getBody());
            } else {
                return 'Error: ' + response.getStatusCode() + ' - ' + response.getBody();
            }
        } catch (Exception e) {
            return 'Exception during callout: ' + e.getMessage();
        }
    }

    //Method to trigger the Maestro workflow
    //@param input (in JSON format)
    public static Map<String,String> triggerWorkflow(String accountId, String workflowId, String inputs){
        // Build the HTTP request
        Http http = new Http();
        HttpRequest req = new HttpRequest();
        req.setEndpoint('callout:'+namedCredintialName+'/accounts/'+accountId+'/workflows/'+workflowId+'/actions/trigger');

        req.setMethod('POST');
        req.setHeader('Content-Type', 'application/json');
        req.setBody(inputs);

        // Send the request
        HttpResponse res = http.send(req);

        // Handle response
        if (res.getStatusCode() == 200) {
            Map<String, object> data = (Map<String, object>) JSON.deserializeUntyped(res.getBody());

            Map<String, String> workflowInstance = new Map<String, String>{
                        'id' => (String) data.get('instance_id'),
                        'name' => (String) data.get('instance_url')
                    };

            return workflowInstance;

        } else {
            System.debug('Failed to trigger workflow. Status: ' + res.getStatusCode());
            return null;
        }

    }

    // Helper to pretty-print JSON using indentation
    private static String formatJson(String rawJson) {
        try {
            Object parsed = JSON.deserializeUntyped(rawJson);
            return JSON.serializePretty(parsed);
        } catch (Exception e) {
            return 'Invalid JSON: ' + e.getMessage();
        }
    }

    // Wrapper class to receive inputs from Flow
    public class TriggerRequest {
        @InvocableVariable(required=true)
        public String accountId;

        @InvocableVariable(required=true)
        public String workflowId;

        @InvocableVariable(required=true)
        public String inputs; // JSON string
    }

    // Wrapper class to return output to Flow
    public class TriggerResponse {
        @InvocableVariable
        public String status;

        @InvocableVariable
        public String instanceUrl;

        @InvocableVariable
        public String instanceId;
    }

    // Flow-invocable method
    @InvocableMethod(label='Trigger Maestro Workflow' description='Triggers a workflow in Maestro via API')
    public static List<TriggerResponse> triggerWorkflow(List<TriggerRequest> requests) {
        List<TriggerResponse> responses = new List<TriggerResponse>();

        for (TriggerRequest req : requests) {
            TriggerResponse res = new TriggerResponse();

            try {
                Http http = new Http();
                HttpRequest httpReq = new HttpRequest();
                String endpoint = 'callout:'+namedCredintialName+'/accounts/' + req.accountId + '/workflows/' + req.workflowId + '/actions/trigger';

                httpReq.setEndpoint(endpoint);
                httpReq.setMethod('POST');
                httpReq.setHeader('Content-Type', 'application/json');
                httpReq.setBody(req.inputs);

                HttpResponse httpRes = http.send(httpReq);

                if (httpRes.getStatusCode() == 202) {
                    Map<String, Object> result = (Map<String, Object>) JSON.deserializeUntyped(httpRes.getBody());
                    res.status = 'Success';
                    res.instanceUrl = String.valueOf(result.get('instance_url'));
                    if (result.containsKey('id')) {
                        res.instanceId = String.valueOf(result.get('instance_id'));
                    }
                } else {
                    res.status = 'Error: '+'HTTP ' + httpRes.getStatusCode() + ': ' + httpRes.getBody();
                }
            } catch (Exception e) {
                res.status = 'Exception: '+e.getMessage();
            }

            responses.add(res);
        }

        return responses;
    }
}Step 2: Create a flow to trigger a Maestro workflow
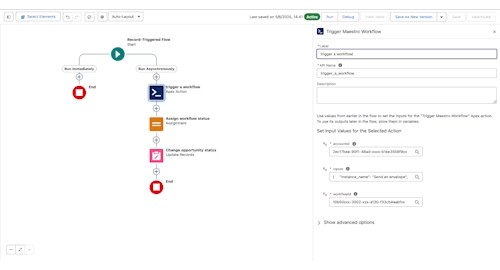
For record-triggered flows, it's recommended to use a scheduled path when invoking the action that initiates the Maestro workflow. This asynchronous approach prevents timing issues associated with callouts.
Go to Flow Builder.
Add an Action element.
Search for Trigger Maestro Workflow.
Provide:
accountId
workflowId
inputs (must be a JSON string)
Use returned values
status
instanceUrl
instanceId

Conclusion
Integrating Salesforce with the Docusign Maestro API enables advanced automation and workflow management within Salesforce. By configuring external and named credentials, users can securely connect Salesforce to the Maestro API. Utilising Apex code, developers can trigger Maestro workflows and retrieve workflow information, facilitating seamless integration. Moreover, by building Salesforce Flow actions, non-developers can leverage these integrations through no-code tools, enhancing efficiency and enabling intricate use cases. This integration empowers organisations to streamline processes, automate agreement workflows, and enhance overall productivity.
Additional resources

Achille joined Docusign in March 2024. He's a skilled software developer and support engineer with past experience at Google and Salesforce.
Related posts
Docusign IAM is the agreement platform your business needs


